
Written by Paul Verburg
Introduction
It's easy to get excited about home automation. You see a couple of interesting products, find a YouTube channel and marvel at the integrations and automations set up in their homes.
It's 7AM, the blinds automatically retract in your room because your home automation server detected the sun is above the horizon. You reach for your phone and start the percolator from an app while still in bed to entice yourself to get out of bed with the wonderful coffee aromas.
While enjoying your coffee, you hear a noise, like something switching, look at your phone and see a notification that the geyser just turned on when the temperature of the water dropped below 45°C, assuring you a nice hot shower after your morning coffee.
Painting this picture is exciting, and often times immediately followed by a sense of depression. You usually just see the end goal, the fully automated and integrated house, and it's daunting. You think "That's so cool! But I have no idea how to code, and I don't know where to start". Then all the excitement is gone and you abandon your smart home ambitions.
I've seen this happen a lot, but with the hardware, community and resources available today, anyone can get started building they're own smart home. One step at a time.
This blog is Part 1 of a multipart series to get everyone who is excited about home automation, but afraid to get started, a platform to start from.
This blog will focus on using Home Assistant, an open source and FREE home automation operating system, to integrate sensors and operate relays from your smartphone or computer, without writing a lot of complicated code.
In Part 1 of the series, we will go through the required hardware, install Home Assistant (HA from here on), create an account and integrate a home power monitor, google Chromecast and a temperature and humidity sensor.
Hardware Requirements
- Raspberry Pi (Model 4 4GB or higher recommended)
- SD Card (16GB or larger)
- SD Card reader (To flash the HA Operating System)
- Ethernet cable (to connect the Pi to your home network)
- Sensors/IoT Devices (This blog will use the Shelly EM, Google Chromecast, ESP8266 with DHT22)
- PC/Laptop (To log into and configure HA)
- Smart phone (If you want to control and monitor your home from the HA app)
Installing Home Assistant
To install HA you need to use a "flashing tool". It's a piece of software that allows you to create a bootable SD card.
We're going to use Balena Etcher in this blog, but Rufus is a lightweight software that also works well.
Navigate to the Balena Etcher home page. You should see the following screen:

Select the version you want to download, in my case it's Etcher for Windows (x86|x64) (Portable)

Install Balena Etcher. Once installed, you will be greeted with the following screen.

Select "Flash from URL" and enter https://github.com/home-assistant/operating-system/releases/download/6.2/haos_rpi4-64-6.2.img.xz as shown below.
You can find the URLs for other Raspberry Pi's from here

Click OK and then Select Target. Here you will get a list of devices plugged into your PC or laptop that are available to install your HA Operating System on. If you do not see anything, make sure you have an SD card plugged into your laptop, either directly if you have a built in card reader, or via a SD card to USB adapter.
Be sure to select the correct storage device, as the next step will erase all data on the device.

Now you can click Flash! to flash the HA operating system onto your SD card.
During the flashing process, you will see the next screen.

After a successful completion, you'll see a flash complete page.

Onboarding Home Assistant
After successfully flashing your SD card, insert the SD card into your Raspberry Pi. Power up your Raspberry Pi and connect it with an ethernet cable to your router or switch connected to your home network.

From a computer connected to the same network as the Raspberry Pi, open a web browser, and enter http://homeassistant.local:8123/.
This should take you to the home assistant onboarding page. This might take a while, so be patient for the initial startup.
If that URL doesn't work, you can try http://homeassistant:8123/.
If that still doesn't work, you can try http://X.X.X.X:8123, where the X.X.X.X is the IP Address that is assigned to your Raspberry Pi.
I will not go into detail on how to find your Raspberry Pi IP address, but will mention two ways to try.
- Log into your router and find the IP address assigned to the ethernet port that you plugged your Raspberry Pi into.
- Use a software to scan for IP addresses on your network (I usually use Angry IP Scanner.
For option 2, you should know the range of your home network already, otherwise the scan might take very long.
The results of the scan shows you all active IP addresses. The home assistant device (Raspberry Pi) will display the name Home Assistant next to the active IP address.
If your boot was successful, you should see the following page when following the http://homeassistant.local:8123/ link.

Choose a name, username and password. Confirm your password.

Create Account.
You will see a screen with preferences.

Select your preferences and click NEXT.

Select your sharing settings and click NEXT.
If you already have IoT devices that HA supports with integrations, Home Assistant will automatically detect them and show them to you.

Configuring Home Assistant
After successfully finishing the onboarding process, you'll be greeted with the HA Overview page.

Congratulations! You have successfully installed Home Assistant on a Raspberry Pi, connected it to your home network, finished the on boarding process and now have a fully functional instance of Home Assistant running on your Raspberry Pi.
However, it feels a little empty. You can see the weather integration, and whether or not the sun is above or below the horizon. This doesn't quite feel like the smart home you've been dreaming about. So let's get going adding some integrations!
Adding Integrations
On the bottom left of your screen, you'll see a configuration tab. Click on it to bring up the configuration page.

Make sure you have Integrations selected on the top of the page.
Here you will find 3 integrations that will always be there, Supervisor, Home and Raspberry Pi Power Supply Checker.
You can ignore them for now.
You will also see automatically discovered integrations on this page.
In my case, I have 2 Google Cast devices in my home, and one Shelly device. These two integrations were automatically discovered, I can proceed and configure them.
Lets start with the Google Cast devices
Click Configure.

A dialogue box appears with the discovered devices. The discovery shows my living room TV. I can now select an area from the Area dropdown list (You can also enter an area that is not on the list).
My other Google Cast device is now also detected.

The Living Room TV devices, is a Chromecast. The Bedroom TV is a Mibox. But both work with the Google Cast technology, and was detected with the Google Cast integration.
Click FINISH, and that's it! Your Google Cast devices are now ready to use via Home Assistant.
Before we start using the new integration, we'll configure the Shelly Integration as well.
Click Configure on the Shelly Integration.
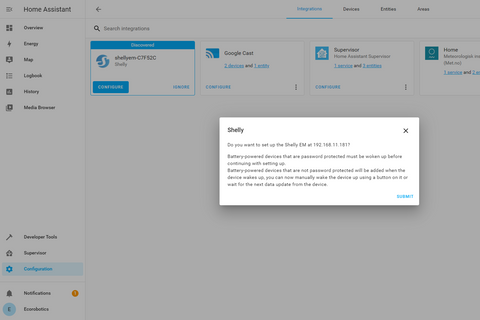
A dialogue box will pop-up with a prompt to confirm if you want to set up the device.
Click SUBMIT

Add an area, and click FINISH.
Navigate back to the Overview page.

The Overview page now shows both Google Cast devices as well as a block with all the Shelly Entities.
Things are starting to take shape!
Notice that my Living Room TV card shows what is currently being streamed (NBC2 on DStv). I can also pause the TV from that card, change the volume or stop the cast.
The Bedroom TV shows nothing, since the MIBOX is switched off.
All the Shelly Entities are available and updating, but the names aren't very descriptive.
We don't want to see a name "shellyem-C7F52C channel 1 Power", we want to see something descriptive, such as "House Power".
To do this, we'll start editing the dashboard.
Editing the Dashboard
First we'll give the channel 1 Power entity a better name.
Go to the top right of the Overview page, click on the three dot menu, and click on Edit Dashboard.

The Shelly card with all the Shelly Entities will now have an EDIT button.
Click on the button to bring up the Entities Card Configuration page.

Click on the Pencil icon next to the channel_1_power entity to enter the Entity Row Editor page.

Here you can add a name and change the icon of the entity.
We will keep the lightning bolt icon, but change the name.

Notice the name of the entity has changed in the card preview on the right.
We now have everything working properly, but we don't want to have our media, weather and power management on the same dashboard. Let's add another tab to the dashboard where we will put the power monitoring information.
Create New Pages in Dashboard
We will create two new pages, one for Power Management, and one for Weather.
All Power Management data will come from the Shelly integration, and all the weather data will come from a DHT22 sensor communicating with an ESP8266 using the Tasmota firmware
If the weather data sounds a bit confusing, don't worry, we will cover how to create a Tasmota device in a future blog.

Go to Edit Dashboard, then click on the orange plus sign. You will see a popup window as shown above.
In this popup window, enter the title you want for the new dashboard. For us, it is Power Management.
 4
4
A new tab will appear next to "HOME", called "Power Management".
Click on Power Management.
We want to display all the Shelly EM information on this page.
Usually, we would click on "Add Card", but we already have a card in HOME that we want in Power Management. And we don't want to show the Shelly information on the HOME page. With this in mind, we will just move the Shelly Card to the new Power Management tab.
On the HOME page, while in edit mode, click the 3 dot menu button on the Shelly Card.

Select "Move to view".

A popup appears with all the available tabs. For us, it is Home and Power Management. We will select Power Management.

The Shelly Card now shows in the Power Management tab, and is removed from the Home tab.
Notice that the tags in the Shelly (Garage) card, has all been named and some have been removed. This has been done as shown before with the channel_1_power entity. This was done to better show what the entities represent.
Now, we will edit the entities to show more user friendly information.
We will do this by adding gauges for the power usage as well as adding a button for the geyser control.
First, click Add Card while on the Power management tab.

The Add Card Configuration menu will appear.

Select Gauge.

The gauge configuration card appears. Here we can add a name and a unit. For this gauge, we will use House Voltage, and Volt.
Repeat this step for House Current Power and Geyser Current Power.
Now we will add a button to toggle the geyser.

Change the name, and leave the rest as default.
After all these changes, we are left with the following Power Management tab.

If we press the Geyser Switch button, the icon will change colour and the Geyser Current Power will change.

Create a new dashboard as before, and name it Weather.
Here, we will add a card and add all the Tasmota entities.

Name the card Living Room.
Name the temperature entity "Living Room Temperature". Name the humidity entity "Living Room Humidity" and name the dew point entity "Living Room Dew Point".

What We've Achieved
In this part, we've managed to get a fully functional instance of Home Assistant running on a Raspberry Pi. On this instance, we've integrated two Google Cast devices, a Shelly device and a tasmota device (We will give more information on setting up a Tasmota device in a future blog), and created Home, Power Management and Weather dashboard.
All of this was done without the need to write a single line of code!
That's how easy it is to start your smart home adventure!
In the next part we will get a bit more technical, and start digging a bit deeper into what can be done with the Home Assistant software.
END OF PART 1